
How to setup a web server on ElasticHosts
24-07-2014
By Rob Stevenson
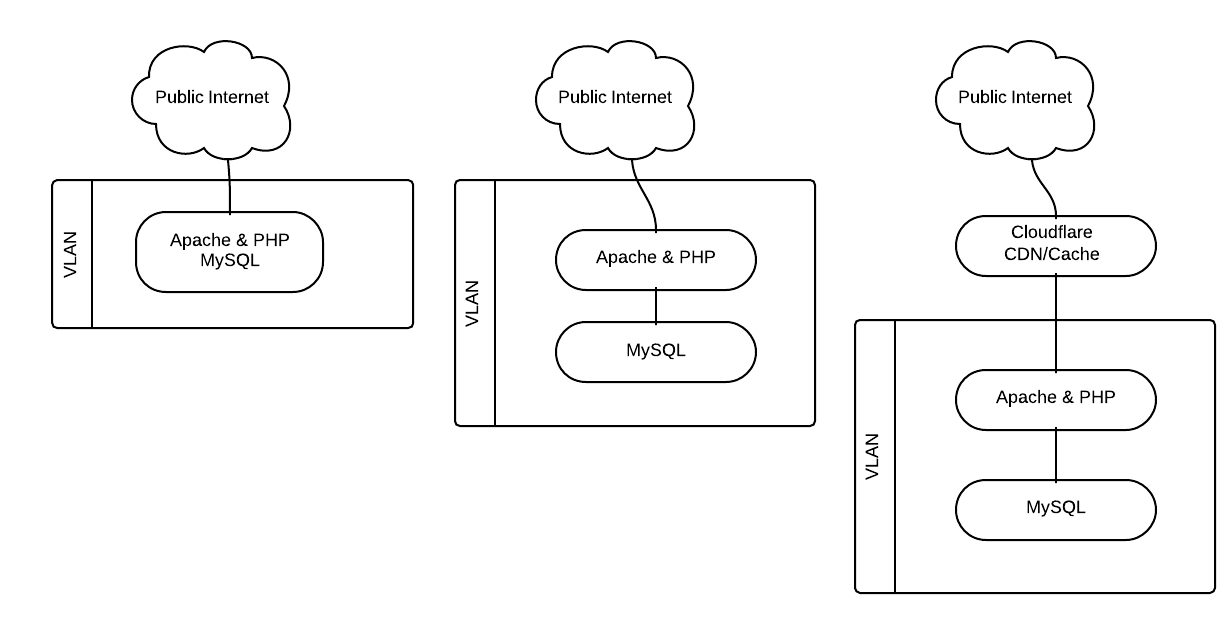
This post details steps to create a set of LAMP servers that will serve a php website with MySQL sitting behind CloudFlare's CDN, Cache and optimizer.
Over the last few years I've been maintaining a virtual private server at a cloud hosting company. I've built it up from a minimal stock CentOS 5 image and it's mostly been doing well. Recently it's got a bit cluttered as I've added more and more to it and I've hit a few memory issues and less than brilliant performance. Nothing against the current host, but it was time to upgrade and I happened to stumble upon ElasticHosts at the exact point I was ready to go.
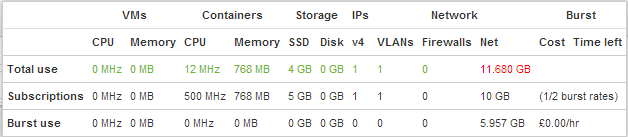
What makes this host appealing to me over my previous host is their new Elastic Containers. Rather than fixing down a system to a set CPU speed, fixed RAM and disk space, this technology allows seamless burts of any of these over your set package. No reboot necessary.
Basically a container isn't a full virtual machine. It's a sand-boxed environment which sees all the available resource and is allocated it dynamclally by the underlying system on demand, up to a pre-determined (by me) maximum. So rather than paying for the 3GB of RAM I need to cope with a weekly peak-usage, I pay for 768MB and for the two hours per week when I need more, it uses it at a cost of a few pence.
[root@cache ~]# free -m
            total   used    free  shared  buffers  cached
Mem:       128878  12789  116089       0       10    3853
-/+ buffers/cache:  8925  119952
Swap:       49151      0   49151

[root@cache ~]# df -h
Filesystem      Size  Used Avail Use% Mounted on
/dev/root       477G  110G  366G  24% /

[root@cache ~]# du -sh / 2>/dev/null
610M    /
Base image
I've based this on a pre-build minimal CentOS 6 image. There are a few common features so I created a base container which I dupliacted to create the other systems.
From the control panel hit 'Add', 'Server (Container)...' and give it a name. Select max sizes (default 2000MHz, 1024MB is probably fine), pre-installed system and pick centos-6 from the dropdown.
Setup a Virtual LAN
Add: Private VLAN
Connect
By default, you can login using ssh with the username toor. The IP address & password you'll need is shown on your control panel. Mac and Linux users can fire up a terminal and type:
ssh 203.0.113.123 -l toorWindows users will need some extra software: download PuTTY plus PuTTYgen and Pageant for later, too.
Next we need to do some standard maintenence setup; update the system, name it and set the time zone. This example uses Europe/London but follow this link for others.
yum update -y
ln -sf /usr/share/zoneinfo/Europe/London /etc/localtime
cat >/etc/sysconfig/clock <<EOF
ZONE="Europe/London"
UTC=true
ARC=false
EOF

cat >>/etc/sysconfig/network <<EOF
HOSTNAME=base.example.com
EOF
Setup the VLAN. Create a new interface config file - Also pick an ip address.
NEWMAC=`ifconfig eth1 | grep HWaddr | awk '{print $5}'`
cat >/etc/sysconfig/network-scripts/ifcfg-eth1 <<EOF
DEVICE=eth1
BOOTPROTO="static"
HWADDR="$NEWMAC"
NM_CONTROLLED="yes"
ONBOOT="yes"
TYPE="Ethernet"
NETMASK=255.255.0.0
IPADDR=172.16.x.d
EOF
Network security
Prevent access to unused ports with iptables. At this stage we just need to block all access except for ssh.
cat >/etc/sysconfig/iptables <<EOF
*filter
:INPUT ACCEPT [0:0]
:FORWARD ACCEPT [0:0]
:OUTPUT ACCEPT [0:0]
-A INPUT -m state --state ESTABLISHED,RELATED -j ACCEPT
-A INPUT -p icmp -j ACCEPT
-A INPUT -i lo -j ACCEPT
-A INPUT -m state --state NEW -m tcp -p tcp --dport 22 -j ACCEPT
-A INPUT -j REJECT --reject-with icmp-host-prohibited
-A FORWARD -j REJECT --reject-with icmp-host-prohibited
COMMIT
EOF
And start service and make sure it starts on boot:
service iptables start
chkconfig iptables on
Configure the ssh daemon to prevent password logins and setup a private key. This is optional but makes connecting easier and more secure. From your computer, generate an ssh key if you haven't already. If you don't know, ~/.ssh/id_rsa will probably exist if you already have one. If you're using Windows, PuTTYgen will create a key for you and Pageant will allow you to manage it without having to type in your key's password every time you connect. Once you've got your key, grab the public key (id_rsa.pub), and paste it into the SSH Keys section at the bottom of the profile/authentication page.
This will create two files ~/.ssh/id_rsa and ~/.ssh/id_rsa.pub. id_rsa should be kept very private while id_rsa.pub should be added to ~/.ssh/authorized_keys of any system you'd like to access with this key.
ssh-keygen -t rsa
cat .ssh/id_rsa.pub
You might need to restart your server before your new key works. Or you can manually add it to ~/.ssh/authorized_keys, but I'm not sure if this file is special on ElasticHosts since it's added to automatically when you add keys to your profile.
You should also disable password logins as soon as you've confirmed you can login with your private key instead of passwords. To do this modify your sshd_config file and restart the ssh daemon.
patch /etc/ssh/sshd_config <<EOF
--- sshd_config         2014-08-06 11:32:04.916253729 +0100
+++ sshd_config.new     2014-08-06 11:23:06.848325452 +0100
@@ -63,7 +63,7 @@
 # To disable tunneled clear text passwords, change to no here!
 #PasswordAuthentication yes
 #PermitEmptyPasswords no
-PasswordAuthentication yes
+PasswordAuthentication no

 # Change to no to disable s/key passwords
 #ChallengeResponseAuthentication yes
@@ -94,7 +94,7 @@
 # PAM authentication, then enable this but set PasswordAuthentication
 # and ChallengeResponseAuthentication to 'no'.
 #UsePAM no
-UsePAM yes
+UsePAM no
EOF

service sshd restart
Setup Postfix so we can receive email destined for the root account. (Courtesy of TecloTech's blog). I've used a Google Apps email account because it makes dealing with spam a non-issue, but this guide, or minor variation of this, should work for most email systems. Install Cyrus to allow secure connections, then create, hash (and secure) a file which will contain valid gmail credentials.
yum install cyrus-sasl-plain
cat >/etc/postfix/sasl_passwd <<EOF
smtp.gmail.com:587 [email protected]:emailpassword
EOF
chmod 600 /etc/postfix/sasl_passwd
postmap hash:/etc/postfix/sasl_passwd
Add some details to Postfix's config file
cat >>/etc/postfix/main.cf <<EOF
relayhost = smtp.gmail.com:587
smtp_tls_security_level = secure
smtp_tls_mandatory_protocols = TLSv1
smtp_tls_mandatory_ciphers = high
smtp_tls_secure_cert_match = nexthop

smtp_tls_CAfile = /etc/postfix/cacert.pem

smtp_sasl_auth_enable = yes
smtp_sasl_password_maps = hash:/etc/postfix/sasl_passwd
smtp_sasl_security_options = noanonymous
EOF
And create a certificate
cd /etc/pki/tls/certs
make hostname.pem
cp /etc/pki/tls/certs/hostname.pem /etc/postfix/cacert.pem
service postfix restart
Redirect local email to a real place
cat >>/etc/aliases <<EOF
root: [email protected]
EOF
newaliases
Test that it all works. This should be delivered to [email protected]
sendmail root <<EOF
Hello World!
EOF
Web server
First shutdown the base image and take a copy. Fire it up and modify the network config:
patch /etc/sysconfig/network <<EOF
--- network	2014-07-23 15:19:02.850816786 +0100
+++ network.new	2014-07-27 22:09:13.810328498 +0100
@@ -1,2 +1,2 @@
-HOSTNAME=base.example.com
+HOSTNAME=web1.example.com
 NETWORKING=yes
EOF
Update the VLAN network to reflect hardware address and IP address
NEWMAC=`ifconfig eth1 | grep HWaddr | awk '{print $5}'`
patch /etc/sysconfig/network-scripts/ifcfg-eth1 <<EOF
--- ifcfg-eth1  2014-07-23 15:19:31.146956710 +0100
+++ ifcfg-eth1.new      2014-07-28 13:20:38.404805597 +0100
@@ -1,8 +1,8 @@
 DEVICE=eth1
 BOOTPROTO="static"
-HWADDR="aa:aa:aa:aa:aa:aa"
+HWADDR="$NEWMAC"
 NM_CONTROLLED="yes"
 ONBOOT="yes"
 TYPE="Ethernet"
 NETMASK=255.255.0.0
-IPADDR=172.16.x.d
+IPADDR=172.16.x.b
EOF

ifdown eth1
ifup eth1
Install and start web server (Apache)
yum install httpd
chkconfig httpd on
service httpd start
Open up the firewall to http requests (port 80)
patch /etc/sysconfig/iptables <<EOF
--- iptables    2014-07-28 14:03:45.874945252 +0100
+++ iptables.new        2014-07-28 14:03:58.745376763 +0100
@@ -8,6 +8,7 @@
 -A INPUT -p icmp -j ACCEPT
 -A INPUT -i lo -j ACCEPT
 -A INPUT -m state --state NEW -m tcp -p tcp --dport 22 -j ACCEPT
+-A INPUT -p tcp -m state --state NEW -m tcp --dport 80 -j ACCEPT
 -A INPUT -j REJECT --reject-with icmp-host-prohibited
 -A FORWARD -j REJECT --reject-with icmp-host-prohibited
 COMMIT
EOF
service iptables restart
If you need any other applications, install them too. In this example, I'm using php any mysqli
yum install php php-mysqli
The default web root is /var/www/html. Unless running multiple sites, this doesn't need to change. So put something in there to test that everything's working
cat >/var/www/html/index.php <<EOF
<!doctype html>
<html lang="en">
<head>
  <meta charset="utf-8">
  <title>Hello World!</title>
</head>

<body>
 <h1>Hello World!</h1>
 <?php echo "<h2>Hello from php!</h2>"; ?>
</body>
</html>
EOF
Database
This is optional, dependent on requirements. A database server could be setup on its own container or on the same container as the web server. If you're likely to be running at any kind of scale, it might be worth setting it up separately but if it will be small, it may as well stay on the same server.
If on a different system, take another copy of base, then setup hostname and VLAN as before:
patch /etc/sysconfig/network <<EOF
--- network     2014-07-23 15:19:02.850816786 +0100
+++ network.new 2014-07-27 22:09:13.810328498 +0100
@@ -1,2 +1,2 @@
-HOSTNAME=base.example.com
+HOSTNAME=db.example.com
 NETWORKING=yes
EOF
Update the VLAN network to reflect hardware address and IP address
NEWMAC=`ifconfig eth1 | grep HWaddr | awk '{print $5}'`
patch /etc/sysconfig/network-scripts/ifcfg-eth1 <<EOF
--- ifcfg-eth1  2014-07-23 15:19:31.146956710 +0100
+++ ifcfg-eth1.new      2014-07-28 13:20:38.404805597 +0100
@@ -1,8 +1,8 @@
 DEVICE=eth1
 BOOTPROTO="static"
-HWADDR="aa:aa:aa:aa:aa:aa"
+HWADDR="$NEWMAC"
 NM_CONTROLLED="yes"
 ONBOOT="yes"
 TYPE="Ethernet"
 NETMASK=255.255.0.0
-IPADDR=172.16.x.d
+IPADDR=172.16.x.c
EOF

ifdown eth1
ifup eth1
Next, where on the web server or a dedicated database server, install and configure mysql:
yum install mysql mysql-server
chkconfig mysqld on
service mysqld start
Create a database and user and change the root password. It's worth adding that granting all privileges is a particularly bad plan for security. You should only give your users the minimal privileges required to do the job.
mysql_secure_installation
mysql -u root <<EOF
SET PASSWORD = PASSWORD('dbrootpassword');
CREATE DATABASE databasename;
GRANT ALL PRIVILEGES ON databasename.*
  To 'databaseuser'@'172.16.x.c'
  IDENTIFIED BY 'dbpassword' WITH GRANT OPTION;
FLUSH PRIVILEGES;
EOF
Set the timezone:
mysql_tzinfo_to_sql /usr/share/zoneinfo | mysql -u root -p mysql
cat >>/etc/my.cnf <<EOF
default-time-zone=Europe/London
EOF
patch /etc/sysconfig/iptables <<EOF
--- iptables    2014-07-28 14:03:45.874945252 +0100
+++ iptables.new        2014-07-28 14:03:58.745376763 +0100
@@ -8,3 +8,4 @@
 -A INPUT -p icmp -j ACCEPT
 -A INPUT -i lo -j ACCEPT
+-A INPUT -m state --state NEW -m tcp -s 172.16.x.c -p tcp --dport 3306 -j ACCEPT
 -A INPUT -m state --state NEW -m tcp -p tcp --dport 22 -j ACCEPT
EOF
service iptables restart
That's it. Point your browser to the IP address (listed in the control panel) of the container running Apache (httpd), and hopefully you should see your 'Hello World!' page. Eg: 203.0.113.123

CloudFlare
Another optional bit - but I can't see any great reason not to! It will even shortly be supporting https as standard.
Signup here. From memory, this is straigh forward enougt not to bother documenting. Let me know if I'm wrong! The Gist is to hand over dns control of your domain to CloudFlare. Check all your dns entries have been copied over and select which records you want CloudFlare to server. Magic, and easy!
comments powered by Disqus